Single Node Slurm Setup
![]()
- This architecture is designed for a single node running Ubuntu 20.04.
- It supports all standard Slurm features.
- The setup is manual to help you understand how Slurm works. Note that users can utilize resources without submitting jobs, so this configuration is not recommended for production environments.
Install slurmd and slurmctld
Install the required software:
sudo apt-get update -y && sudo apt-get install -y slurmd slurmctld
Verify the installation:
# Locate slurmd and slurmctld
which slurmd
# Output: /usr/sbin/slurmd
which slurmctld
# Output: /usr/sbin/slurmctld
Prepare slurm.conf
- This configuration applies to all nodes.
Create the slurm.conf file:
cat <<EOF > slurm.conf
# slurm.conf for a single-node Slurm cluster with accounting
ClusterName=localcluster
SlurmctldHost=localhost
MpiDefault=none
ProctrackType=proctrack/linuxproc
ReturnToService=2
SlurmctldPidFile=/run/slurmctld.pid
SlurmctldPort=6817
SlurmdPidFile=/run/slurmd.pid
SlurmdPort=6818
SlurmdSpoolDir=/var/lib/slurm-llnl/slurmd
SlurmUser=slurm
StateSaveLocation=/var/lib/slurm-llnl/slurmctld
SwitchType=switch/none
TaskPlugin=task/none

# TIMERS
InactiveLimit=0
KillWait=30
MinJobAge=300
SlurmctldTimeout=120
SlurmdTimeout=300
Waittime=0

# SCHEDULING
SchedulerType=sched/backfill
SelectType=select/cons_tres
SelectTypeParameters=CR_Core

# ACCOUNTING (slurmdbd, not enabled now)
AccountingStorageType=accounting_storage/none
JobAcctGatherType=jobacct_gather/none
JobAcctGatherFrequency=30

# LOGGING
SlurmctldDebug=info
SlurmctldLogFile=/var/log/slurm-llnl/slurmctld.log
SlurmdDebug=info
SlurmdLogFile=/var/log/slurm-llnl/slurmd.log

# COMPUTE NODES (Single-node configuration)
NodeName=localhost CPUs=2 Sockets=1 CoresPerSocket=2 ThreadsPerCore=1 RealMemory=1024 State=UNKNOWN

# PARTITION CONFIGURATION
PartitionName=LocalQ Nodes=ALL Default=YES MaxTime=INFINITE State=UP
EOF
Move the file to the correct location:
sudo mv slurm.conf /etc/slurm-llnl/slurm.conf
Start Basic Slurm Services
Start the slurmd service:
# Start the service
sudo service slurmd start
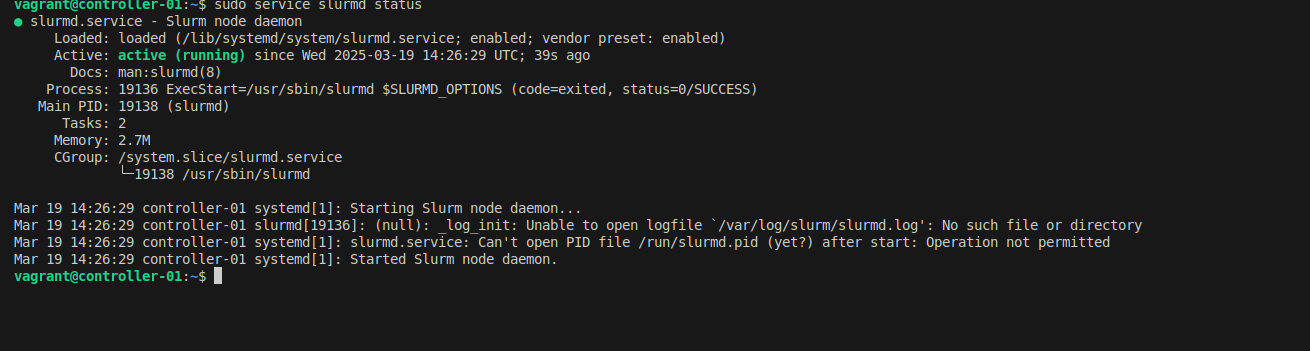
# Check its status
sudo service slurmd status
Start the slurmctld service:
# Start the service
sudo service slurmctld start
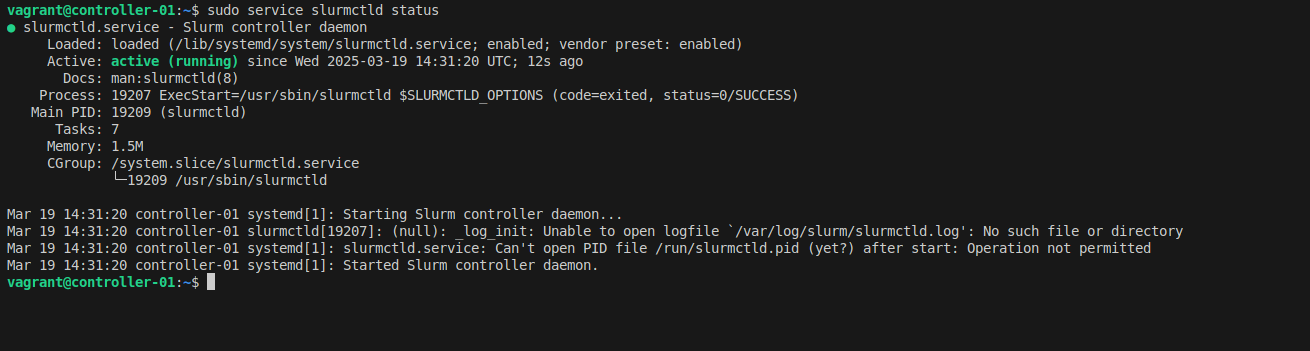
# Check its status
sudo service slurmctld status
Submit a small job (adjust CPUs and memory as needed):
srun --mem 500MB -c 1 --pty bash
# Check details of submitted jobs
squeue -o "%i %P %u %T %M %l %D %C %m %R %Z %N" | column -t
Before submitting the job, memory usage is less than 200MB:

Allocate 100MB of memory repeatedly:
declare -a mem
i=0

while :; do
    mem[$i]=$(head -c 100M </dev/zero | tr '\000' 'x')
    ((i++))
    echo "Allocated: $((i * 100)) MB"
done
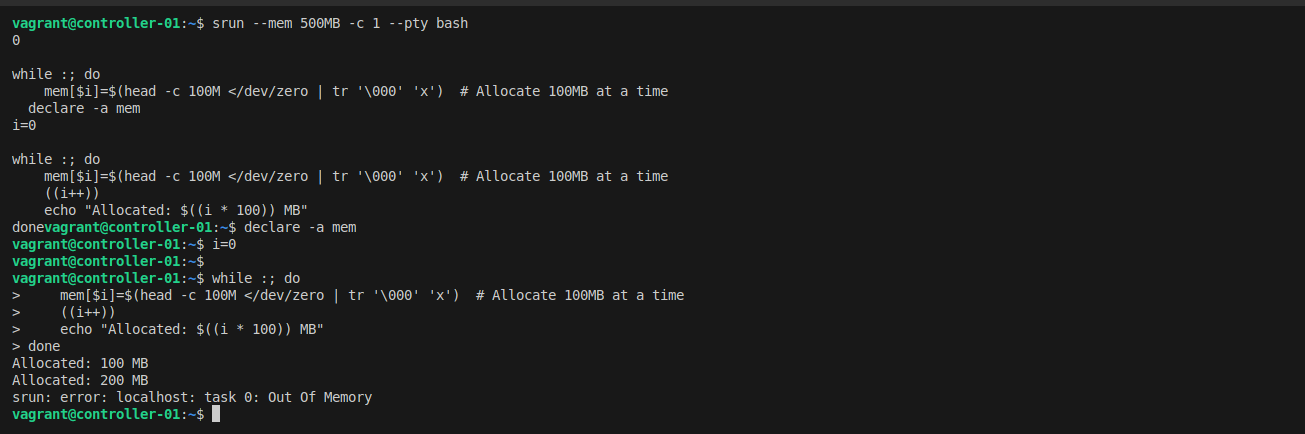
After allocating 1GB, the job is not killed due to missing control group (cgroup) configuration:

Limit Resources Using cgroups
Create a cgroup.conf file to restrict resource usage:
cat <<EOF >cgroup.conf
CgroupAutomount=yes
CgroupMountpoint=/sys/fs/cgroup
ConstrainCores=yes
ConstrainRAMSpace=yes
ConstrainDevices=yes
ConstrainSwapSpace=yes
MaxSwapPercent=5
MemorySwappiness=0
EOF
Move the file to the correct directory:
sudo mv cgroup.conf /etc/slurm-llnl/cgroup.conf
Update slurm.conf to enable cgroup plugins:
sudo sed -i -e "s|ProctrackType=proctrack/linuxproc|ProctrackType=proctrack/cgroup|" \
            -e "s|TaskPlugin=task/none|TaskPlugin=task/cgroup|" /etc/slurm-llnl/slurm.conf
Enable cgroup in GRUB and reboot:
sudo sed -i 's/^GRUB_CMDLINE_LINUX="/GRUB_CMDLINE_LINUX="cgroup_enable=memory swapaccount=1 /' /etc/default/grub
sudo update-grub
sudo reboot
Restart Slurm services:
sudo service slurmctld restart
sudo service slurmd restart
Rerun the memory allocation job. This time, the job will be killed when it exceeds the memory limit:
srun --mem 500MB -c 1 --pty bash
declare -a mem
i=0

while :; do
    mem[$i]=$(head -c 100M </dev/zero | tr '\000' 'x')
    ((i++))
    echo "Allocated: $((i * 100)) MB"
done
Enable Slurm Accounting
Accounting allows monitoring of jobs, resource allocation, and permissions.

Install slurmdbd
sudo apt-get install slurmdbd mariadb-server -y
Configure slurmdbd.conf
- Enables the accounting plugin to store account information.
- Maps Linux users to Slurm accounts. Users cannot submit jobs without being added.
- Useful for monitoring jobs and optimizing resource usage.
Create the slurmdbd.conf file:
cat <<EOF >slurmdbd.conf
PidFile=/run/slurmdbd.pid
LogFile=/var/log/slurm/slurmdbd.log
DebugLevel=error
DbdHost=localhost
DbdPort=6819

# DB connection data
StorageType=accounting_storage/mysql
StorageHost=localhost
StoragePort=3306
StorageUser=slurm
StoragePass=slurm
StorageLoc=slurm_acct_db
SlurmUser=slurm
EOF
Move the file to the correct location:
sudo mv slurmdbd.conf /etc/slurm-llnl/slurmdbd.conf
Create the Database
Create the database and user:
sudo service mysql start
sudo mysql -e "CREATE DATABASE slurm_acct_db;" && \
sudo mysql -e "CREATE USER 'slurm'@'localhost' IDENTIFIED BY 'slurm';" && \
sudo mysql -e "GRANT ALL PRIVILEGES ON slurm_acct_db.* TO 'slurm'@'localhost';" && \
sudo mysql -e "FLUSH PRIVILEGES;"
Verify the database and user:
sudo mysql -e "SHOW DATABASES;"
sudo mysql -e "SELECT User, Host FROM mysql.user;"
sudo mysql -e "SHOW GRANTS FOR 'slurm'@'localhost';"

Start slurmdbd Service
sudo service slurmdbd start
Update slurm.conf to enable accounting:
sudo sed -i -e "s|AccountingStorageType=accounting_storage/none|AccountingStorageType=accounting_storage/slurmdbd\nAccountingStorageEnforce=associations,limits,qos\nAccountingStorageHost=localhost\nAccountingStoragePort=6819|" /etc/slurm-llnl/slurm.conf
sudo sed -i -e "s|JobAcctGatherType=jobacct_gather/none|JobAcctGatherType=jobacct_gather/cgroup|" /etc/slurm-llnl/slurm.conf
sudo systemctl restart slurmctl slurmd
Add Linux users to Slurm accounting:
sudo sacctmgr -i add cluster localcluster
sudo sacctmgr -i --quiet add account $USER Cluster=localcluster
sudo sacctmgr -i --quiet add user $USER account=$USER DefaultAccount=root
sudo systemctl restart slurmctl slurmd

Submit a Job and View Metrics
Submit a job:
srun --mem 500MB -c 1 --pty bash
Conclusion
- Slurm is widely used in academic and industrial settings for orchestrating distributed jobs across multiple nodes.
- While Slurm is relatively easy to set up, critical steps like resource limits and accounting are often overlooked.
- Slurm integrates seamlessly with distributed computing frameworks like Spark, Ray, Dask, and Flink, enabling efficient resource utilization for local development.